Saturday 15 June 2013

Access Data of a Password Protected User in Windows XP when fails to Boot

You may come across a situation in which your windows XP PC fails to reboot, and the most accepted solution to that problem is to re-format the Hard Disk. Before formatting, you should backup your files. If your computer is password protected, you won't be able to access them from outside, so here is a method for getting around this.


Steps :


1. Boot the machine from Windows XP bootable CD.
2. At the setup screen, select R to repair using Recovery Console.
3. Now the console program will prompt you to select the Windows folder (eg. C:\WINDOWS) where the Windows is installed (you need to enter a number from the list of folders shown to you).
4. Type 'HELP' (without single quotes) and press enter for available commands. This is like a DOS program, but some features are not available
5. Change the current directory to the user's directory where you want to backup.
6. Type 'CD "C:\Documents and Settings\X"' (without single quotes) and press enter. Where X is theusername.
7. Now the current directory will change to "C:\Documents and Settings\X".
8. Now change the directory to Desktop by entering 'CD Desktop' (without single quotes) and press enter to go to the desktop folder.
9. Type 'DIR' (Without single quotes) and press enter, you will be listed all the available files in Desktop.
10. Type 'COPY a.doc D:\BACKUP' (without quotes) and press enter, where a.doc is a file available in Desktop and the folder D:\BACKUP available to copy the files.
11. As in step 7,8,9,10 you can backup other folders like "My Documents", "My Music", etc.
12. Note that you cannot use wildcards for COPY, i.e. you cannot copy all the files in a folder at once. You must copy one file by one. 


  Before doing this, try changing the password to blank so that you can access the data from another machine to easily drag and drop to copy your data.
  Any data not backed up will be permanently deleted when you re-format the hard drive, so make sure you back up any thing you want to keep.

Requirement:

A Bootable Windows XP CD

How to Crack password protected RAR files like a hacker (Brute Force attack)?

Install the RAR password remover software as said in my last post. 
Let me show how to crack the password protected RAR files using Brute Force attack method. 

Step 1:
Run the application start->Allprograms->RAR password Recovery->RAR password Recovery

Step 2:
Now the Password Recovery windows is opened. Click the open button at the top of the window.


Step 3:
Browse to the Password protected RAR file and select.


Step 4:

Now set the Minmum and Maximu length of password(it's your choice)
Set allowed characters(if you think it is simple password, then select only lowercase).


Step 5:Start Cracking process
Click the Start Button. It will start to crack using brute force attack.
Wait..wait...wait........

It will take time depending on the password strength. 
if you have luck, it will be finished within 10 minutes
if you have bad luck, it will take 10months. 
All depending on the password strength.

How to crack or Reset BIOS Password?


The BIOS software is built into the PC, and is the first code run by a PC when powered on ('boot firmware'). The primary function of the BIOS is to set up the hardware and load and start a boot loader. When the PC starts up, the first job for the BIOS is to initialize and identify system devices such as the video display card, keyboard and mouse, hard disk drive, optical disc drive and other hardware. The BIOS then locates software held on a peripheral device (designated as a 'boot device'), such as a hard disk or a CD/DVD, and loads and executes that software, giving it control of the PC. This process is known as booting, or booting up, which is short for bootstrapping.
Bios password is usually used to protect the user's BIOS settings on the computer. If you want to reset the password on the BIOS does not need to bother to connect bateray CMOSnya, with a little trick on the Dos you can reset the BIOS password on it in 2 ways:

1. Clear CMOS
This way I consider the most ancient and most easy to break down the password on the BIOS. The steps are easy, first open the casing cover computer CPU. Then find the bios battery that looks something like the battery just a little more big clock. After the meet and consider the area around the battery there is usually a jumper with 3 pins, 2 pins and 1 pin not connected. 

Suppose the three pins with the code 1 - 2 - 3. Connector that connects the initial position usually is 2-3. To reset the bios do I move the position of the plug that connects pins 2-3 to position 1-2 for about 5 seconds. Then plug it back into the starting position (2-3). Try restarting the computer back on, secured the bios password is gone. 

If the above looks complicated, is easy to clear cmos by unplugging the BIOS battery and then put it back. But with the consequences of removing the label is the warranty on the battery BIOS.

2. Through DOS 

First out of the windows with me restart your computer, start the computer in MS-DOS mode, use the option "Command Prompt Only" 

At c: prompt, type: DEBUG 
press enter. You will see the sign (-) at the DEBUG prompt, then type: 
o 70 2e 
at the DEBUG prompt will be displayed as-o 70 2e. 
press enter and type: 
-O 71 ff 
press enter, the last type: 

hit enter, then you will get out of the DEBUG prompt and return to the C:> prompt. 
Now restart your COMPUTER, and see the results 

Wednesday 1 May 2013

Ostinato - Packet/Traffic Generator and Analyzer


Introduction
Ostinato is an open-source, cross-platform network packet crafter/traffic generator and analyzer with a friendly GUI. Craft and send packets of several streams with different protocols at different rates.

Features
Runs on Windows, Linux, BSD and Mac OS X (Will probably run on other platforms also with little or no modification but this hasn't been tested)
Open, edit, replay and save PCAP files
Support for the most common standard protocols
Ethernet/802.3/LLC SNAP
VLAN (with QinQ)
ARP, IPv4, IPv6, IP-in-IP a.k.a IP Tunnelling (6over4, 4over6, 4over4, 6over6)
TCP, UDP, ICMPv4, ICMPv6, IGMP, MLD
Any text based protocol (HTTP, SIP, RTSP, NNTP etc.)
More protocols in the works ...
Modify any field of any protocol (some protocols allow changing packet fields with every packet at run time e.g. changing IP/MAC addresses)
User provided Hex Dump - specify some or all bytes in a packet
User defined script to substitute for an unimplemented protocol (EXPERIMENTAL)
Stack protocols in any arbitrary order
Create and configure multiple streams
Configure stream rates, bursts, no. of packets
Single client can control and configure multiple ports on multiple computers generating traffic
Exclusive control of a port to prevent the OS from sending stray packets provides a controlled testing environment
Statistics Window shows realtime port receive/transmit statistics and rates
Capture packets and view them (needs Wireshark to view the captured packets)
Framework to add new protocol builders easily

Download 

Defending DDoS attacks on Apache webserver the easy way


Defending any server from DDoS is always like , protecting a virgin on a lonely island from 100 rapists. But we have a effective method to stop these brutal f*cking to protect our respective Apache web server.  Here we have one Apache module called Mod_evasive, Mod_evasive is an Apache unit that is intended to boundary the shock of unusual types of attacks like Distributed Denial of Services Attack or may be  brute force on your web site/server. while incorporated with iptables, mod_evasive can set up to even larger attacks. The component detect attack by creating an domestic hash of IP Addresses and URIs, and denying any single IP address from executing request a page more than the allowed times per second, make more than 50 concurrent requests per second on the same child process, make a single request while blacklisted

On any DEBIAN based operating system like Backtrack 5 R2 or Blackbuntu just follow the following command to install it.

$ sudo apt-get install libapache2-mod-evasive

After its installation done , the component  is already enabled and is defending your web server automatically.

How to Secure your Enterprise with Free SSL Certificate

The Secure Sockets Layer (SSL) is a commonly-used protocol for managing the security of a message transmission on the Internet. SSL has recently been succeeded by Transport Layer Security (TLS), which is based on SSL. SSL uses a program layer located between the Internet's Hypertext Transfer Protocol (HTTP) and Transport Control Protocol (TCP) layers.

Why Use SSL ? 
Secure Sockets Layer (SSL) is a message transportation protocol that provides the following

Advantages of SSLAuthenticated:- The origin of all messages is assured.

Reliable:-The message transport uses a message integrity check (using a MAC) that ensures the quality of the data being transmitted.

Private:-Messages between the components are encrypted, after a handshake to define a secret key. This ensures that the contents of the messages cannot be read by a third party. If all of your components are behind a firewall, or some other means of protection, and do not require encryption, privacy can be disabled without comprising the authentication and reliability aspects of SSL.


               :: 0x02 Starting to Setup up SSL ::

Things required ssh with root access (For this Tutorial) Apache web server (I’m using apache, slightly different method for others)
An Account at http://www.startssl.com (Sign up for the free one)

Let’s Start,Generating RSA Private key
Install & enable OpenSSL (sudo apt-get install openssl / yum install openssl & then sudo a2enmod ssl
; sudo /etc/init.d/apache2 force-reload)


Then to generate the key, give this command.

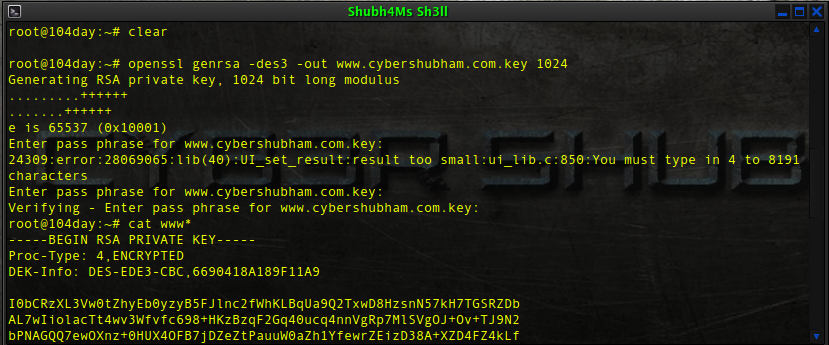
# openssl genrsa -des3 -out www.cybershubham.com.key 1024


The key will be generate now, and will be saved as www.cybershubham.com.key.

Generating CSR (Certificate Signing Request)
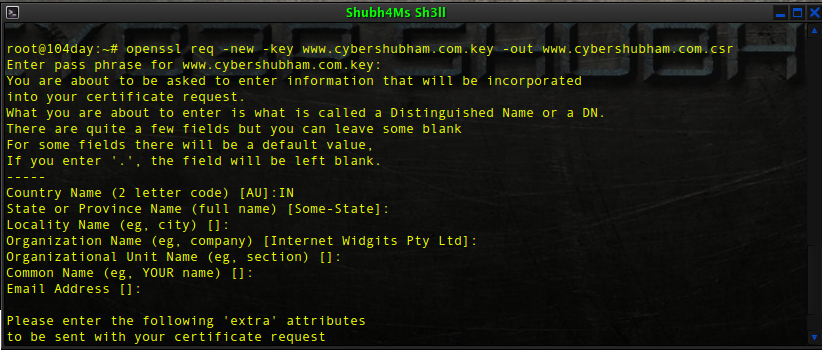
Using the key generate above, you should generate a certificate request file (csr) using openssl as shown below with following command.

# openssl req -new -key www.cybershubham.com.key -out www.cybershubham.com.csr


The csr will generate now, & will be saved as www.cybershubham.com.csr                   :: 0x03 Getting a Valid Signed Certificate ::

Hope you have already registered at StartSSL, & validated your domain name.So let’s go forward,

   :: 0x03 Getting a Valid Signed Certificate ::

Hope you have already registered at StartSSL, & validated your domain name.So let’s go forward,

Select Certificate Purpose

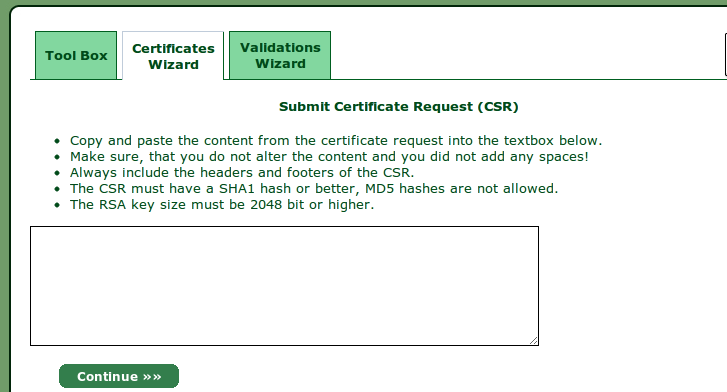
Submit CSR

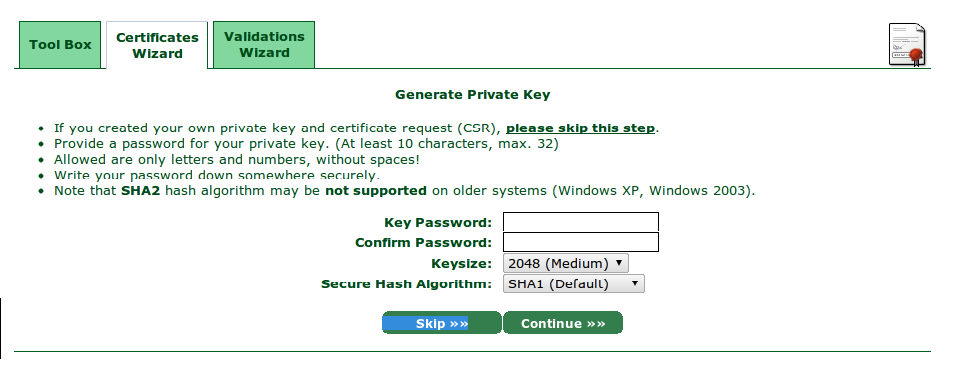
Skip the above screen & move forward, as we have already generated the CSR & Key.


Paste your CSR here & click continue.
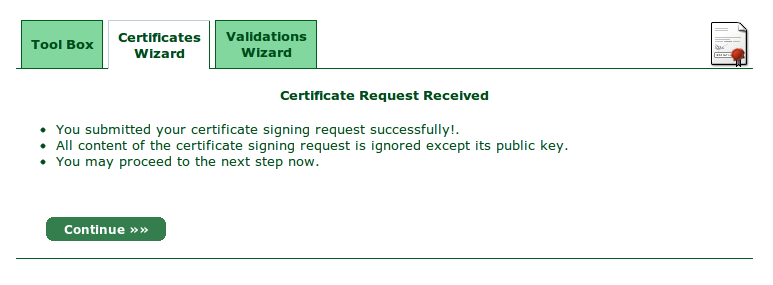
Click continue.
Selecting Sub Domain

As for the basic free certificate, we don’t get certificate for all our sub domains. you want ssl for your main website. just put www.
Follow the rest 1-2 steps, they are easy.
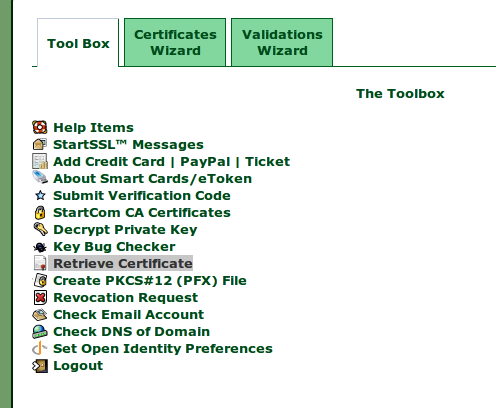
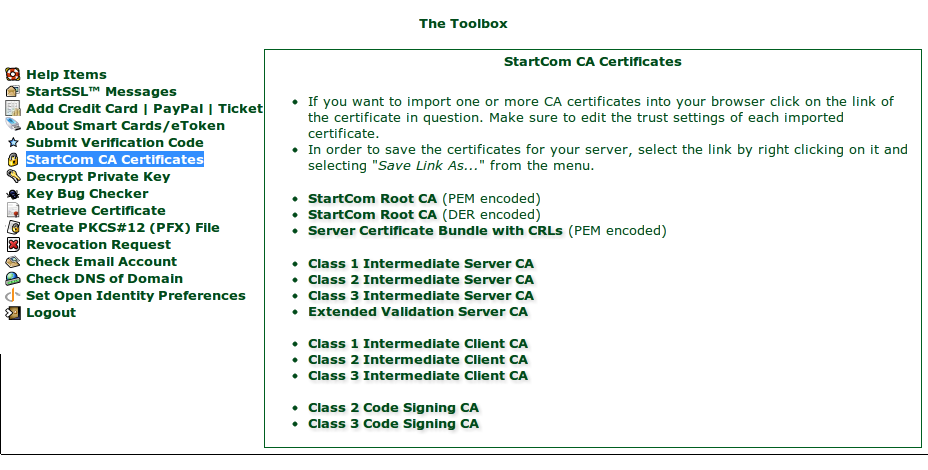
Retrieve Chain File

Download the StartCom Root CA (PEM encoded file).

:: 0x04 Configuring Web Server ::

Every web server has different configuration, I’ll tell you how to configure apache.

Step 1- Gather all files- the key file(www.cybershubham.com.key) ,  The retrieved certificate file (www.cybershubham.com.crt) , the Chain file (CA.pem)

Step 2-
# cd /etc/apache2
# mkdir ssl

Step 3-
Upload all files in the ssl directory with ftp or simply use nano command in ssh.

Step 4-
# cd /etc/apache2
# cd sites-available
# nano default-ssl

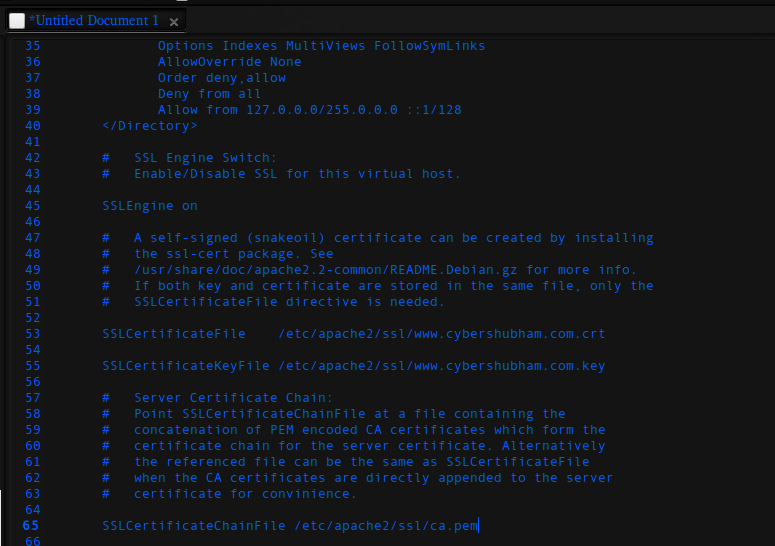
Most important part, but quite easy just set the write path to files. like this-


Step 5- Configure ports
# cd  /etc/apache2
# nano ports.conf

simply add "listen 443” after listen 80 line. (without quotes)

Step 6- Restarting Apache

# /etc/init.d/apache2 reload
# /etc/init.d/apache2 restart


Now you are done !!! Just open https://www.cybershubham.com to check if it works ;)

Step 7- Make https default
# cd /var/www/cybershubham.com/web/
# nano .htaccess

Paste the following content now -

RewriteEngine On
RewriteCond %{SERVER_PORT} 80
RewriteRule ^(.*)$ https://www.cybershubham.com/$1 [R,L]

Now all users will land on https :),Hope you liked the post. 

Tuesday 16 April 2013

The history of Hacking


I have remodified this History of hacking based on St. Petersburg times newspaper


The history of computer hacking can be traced back to the 1870s, but I will emphasize on the most recent years for simplicity.
The 1960s

    It all started at MIT’s (Massachusetts Institute of Technology) artificial intelligence lab.The university’s mainframe computers were used by the first hackers. At first, hacker was a name with a positive significance for a person who was good at computers and could push computer programs beyond the normal functioning standard. It was a borrowed name from a term to describe members of a model train group at MIT who hacked the electric trains and switches to make them perform faster, better and differently.


The 1970s

    John Draper was the talk of the 70s because of his ability to make free calls. He built a "blue box" that, when used together with the whistle and phone receiver, phone calls would be made for free. He was arrested on several counts for tampering with the phone lines throughout the 70s. Steve Jobs, Steve Wozniak (founders of apple computer) used this knowledge.


The early 1980s 

    People often say the public was lured into hacking by the movie war game. The main character was Matthew Broderick. It is said that the movie made hackers seem cyber heroes which captured the imagination of young minds in this year.

    Hacking groups like Legion of Doom in the United States, and Chaos Computer Club in Germany began to emerge. Sherwood Forest and Catch-22 were used by phreaks and hackers to interact, and share stolen passwords and credit card numbers.

    Los Alamos labaoratory’s computers for developing nuclear weapons were hacked by the 414 gang. A gang that comprised of six teenagers who were later apprehended by the law.


The Late 1980s

    The Computer Fraud and Abuse Act was passed in 1986
    A self-replicating worm was use on the government's ARPAnet to test its effect on UNIX systems by Robert T. Morris, Jr., a graduate student at Cornell University. Which later spread to 6000 computers. He was fined 10,000 USD.

    Some German hackers were arrested for breaking into the United States government and corporate computers and sold operating-system source code to the Russian KGB.


The early 1990s

    A radio stations phone system was rigged by three hacker-friends during a call-in contest. They won 20 000USD, two cars and all expense paid trips.

    The use of internet came in and hackers started formulating new strategies.

    Kevin Mitnick was arrested for stealing 20,000 credit card numbers.

    Vladimir Levin and other Russian crackers siphoned 10 million USD from Citibank and transfer it to bank accounts in Finland and Israel.


The late 1990s
    The hacking group Cult of the Dead Cow releases its Trojan horse program, Back Orifice. Once installed on a machine with Windows 95 or Windows 98 Operating systems, it allows unauthorized remote access to the machine.
    A 19-year-old Israeli hacker Ehud Tenenbaum known as Analyzer was arrested for breaking into pentagon’s computers and stealing some software.


The 2000s 

Well, the popular attacks in the 2000s are,
    the attacks launched on yahoo, Amazon and eBay, that resulted to the denial of service for users.


    Break-ins on Microsoft, for latest versions of their products. The 2001 attack that led to the prevention of millions of users from reaching Microsoft Web pages for two days.


This brief history of Hacking and cracking above is meant to serve as a quick reference point to those who really want to know how it all started. That's why its been in summary. Its good to know the history of most things we do. 

Download torrents Without Torrent Client!


A unique online service called Torrent2exe allows users to download torrents without having to install a torrent client by converting the torrent file into a standalone EXE file. Using Torrent2exe is very simple. Copy the URL of the torrent file or browse to the location of the torrent file in your hard disk to automatically upload it to their site. Once you they have got the URL of the torrent file, they will convert it into a self extracting EXE file.
Here you get the option to select the size of the EXE file to be downloaded. Suppose you want to see a movie. What will you require? A media player and the movie. Now you get two choices.
Firstly, you download the movie and the media player, which needs to be downloaded only once. Subsequent movie downloads do not require you to download the movie player since you have already downloaded it.
However, if you move to another computer you will need to download the movie player once again. This is the "small size".
In the second choice, you download the movie along with the media player every time you download a new movie. This is the "normal size"
After you have download the converted EXE file, just run it and it will automatically start downloading the torrent.
The standalone EXE file makes it easier for people to share files and applications on the Internet. You can publish the EXE files on your site or blog to make the downloads easy for visitors, send EXE files to your friends who don't want to be bothered with installing the client.
Torrent2exe is available both as an online service and as a desktop application.

Remove duplicate files the easy way

I have always wanted this kind of software. I have thousands of mp3 songs packed in various partitions of my hard disk. I have collected these songs from several places and keep them storing, but the problem while augmenting my collection is that I am never sure whether I have copied the set of songs before or not, so I just copy them irrespective of the fact that they may be already present. The consequence is that my limited 40GB hard disk space is almost full leaving me with no more space to store anything else.
That is why I always wanted a software that could compare the contents of two folders and remove the duplicate elements.


File Comparator is a program which compares any files by their contents. This utility allow you to quickly compare contents of any files in specified folders, and allow to show files which contain same data.

Wednesday 27 March 2013

Tata photon + Hack [Break Password]

Are you a user of tata photon, someone locked it and you want to use internet but do not know the password, no such a big matter, its simple as drinking water!
Break the password in these simple steps:-
1. Goto C:\Program Files\Tata Photon+\Huawei\userdata [Installation folder]
2. Then open UserSetting.xml
3. It will look like this:

<?xml version="1.0" encoding="UTF-8"?>
<utpsdoc>
<system>
<devicename>EC1261</devicename>
</system>
<security>
<GeneralLock>1</GeneralLock>
<InternetLock>1</InternetLock>
<LockPassword>1234</LockPassword>
</security>
<CBSSettingPlugin>
<AutoCleanup>0</AutoCleanup>
</CBSSettingPlugin>
<xframemodule>
<undialupromaining>0</undialupromaining>
<nosplashscreen>0</nosplashscreen>
</xframemodule>
</utpsdoc>

4.Now, see these lines:-

<GeneralLock>1</GeneralLock>
<InternetLock>1</InternetLock>
<LockPassword>1234</LockPassword>


Here is your current password, see your password in this field <LockPassword>1234</LockPassword>
Very poor and hackable programming!

How to monitor your internet usage:

A lot of internet users want to monitor his/her internet usage. I think you too. But, many of them dont know how to do it. So, we have written this tutorial for you all.
By reading this tutorial, you will be able to monitor your internet usage, i.e. your download usage, upload usage, etc.

Steps:-


  • First of all, you need a software named "Broadband Usage Meter", you may download it from here: http://www.rackeys.com/Downloads/Softwares.html , its a small software but powerful.
  • After download, double click on it to run the setup wizard, then install. It may ask you to select your network, then select it. For example, if you are using photon +, then installer will show you tata photon + in the list, select it and continue. Dont forget to check any option of auto start on windows startup.
  • It will run automatically on windows startup.
  • Now, its monitoring your internet usage. A meter will come at the top of your screen in green color. This will show your all statics.


Another good program like "Broadband Usage Meter" is:
NetWorx, its also good. Just install it and start using it.

There are a few more good programs for this, you may also like this: http://www.shaplus.com/bandwidth-meter/ [Freeware]
http://addgadget.com/network_meter/ [Shareware]
http://www.bwmonitor.com/freedown.htm [Freeware]
http://www.rokario.com/products/bandmon/2-0/ [Freeware]
http://www.hageltech.com/dumeter/about [Shareware]

Enjoy

Tuesday 19 March 2013

Hacking Any PC Using IP Address

Literally, hacking is to get something or someone on the internet without
their consent or interest. While speaking of a short, hacking is a very easy
job, it is as if instead of the using front door, finding a hidden door of a
house and the seizure of valuables(hijacking the precious things). Among
the main hacking, hacking through the IP address is one of the most
common yet with a powerful beggining.
You may want to hack the website and put your advertisement there or grab
some database information.
In this type of hacking, you are playing with the web server’s computer
instead of the administrator’s computer.
Because for eg. www.website.com is in a separate Web server instead of
the personal computer.
Another might be to access the computer of your friend from your home.
Again, based on IP, and it is only possible when your friend’s computer is
online. If it is off or not connected to the Internet, allowing external IP
hacking(remote IP Hacking) is quite impossible.
Well, both have the same process. So Let's summarize what we should do.
First Of All Confirm the site or the computer you wanna hack.
1. Discover or trace their IP addresses.
2. Verify that the IP address is online
3. Scan open ports
4. Check the doors Venerability(for venerable ports)
5. Access through the door(probably the port).
6. Brute force username and password
Now let me just briefly describe the basic steps that a child can also
understand if you didnt get.
First, get the IP address of the victim.
To get the IP address of the victim's website, ping for it in command
prompt.
For example,
ping www.google.com
=>
To retrieve the IP address of google.com
That's how we can get the IP address of the victim's website.
What about your friend's PC? You can't do www.yourfriendname.com, huh?
Finding the IP address of your friend's PC is a bit complicated and most
difficult, if it has a dynamic IP address, which changes constantly.
A common method to detect the IP address of your friend is talking to him.
Go Here From your Friend's Computer:
http://www.tracemyip.org/
From Here You Can Check Out His IP-Address & Note It Down somewhere.
Now, did you have the IP address?
If yes then do check it out if he/she's online? ITo know the online status just
ping the IP address, if it is online it will reply.
If the IP address is online, scan for the open ports. Open ports are like
closed doors, without locks, you can get in and out easily.
Use the Advanced Port Scanner to scan all open and venerable ports/doors.
Now that you have the IP address and open port of the victim, now you can
use telnet to try to access it.
Make sure you have telnet enabled on your computer or install it from:
Control Panel > Add or Remove Programs > Add Windows Components
Then open command prompt and use the telnet command to access the IP
address.
Use the following syntax for the connection.
You will be prompted for login information.
If you can easily guess the information then it's okay. Or you can use some
brute force tools below.
1. Brutus
Brutus is one of the fastest, most flexible remote password crackers you can
get your hands on - is also free. It 'available for Windows 9x, NT and 2000,
there is no UN * X version available although it is possible at some point in
the future. This Windows-only cracker bangs against network services of
remote systems trying to guess passwords using a dictionary and its
permutations. It supports HTTP, POP3, FTP, SMB, Telnet, IMAP, NTP, and
more.
Platform: Windows
2. THC-HYDRA
This tool enables the rapid dictionary attacks against systems connecting to
the network, including FTP, POP3, IMAP, Net-bios, Telnet, HTTP
authentication, LDAP NNTP, VNC, ICQ, SOCKS5, PCNFS, and more. Includes
SSL support and is apparently now part of Nessus.
Platform: UNIX , Windows
3. TSGrinder
TSGrinder terminal server is the first gross instrument of force. The main
idea is that the administrator account, since it cannot be locked out for local
logons, can be brute forced. And having an encrypted channel for the
process of TS Logon that helps to keep IDS from catching the attempts.
This is a "dictionary" based attack tool, but has some interesting features
like "1337" conversion and supports multiple attack windows from a single
dictionary file. It supports multiple password attempts in the same way, and
lets you specify how often you try a combination of username / password
on a particular connection.
Platform: Windows
In this way, you will be able to hack remote computer using just the IP
address . !!

How to Hide Entire Drives Partition Without Registry

f you want to hide your entire drive partition, then you can use this cool trick which hides entire hard disk drives by a simple procedure.
This is the best security tip to be employ against unauthorised users.

Steps:

  • Go to Start > Run > type “diskpart“.
  • Then type “list volume
  • Suppose you want to hide drive E then type “select volume 3″
  • Now type “remove letter E
  • Sometime it requires to reboot the computer.
  • Diskpart will remove the letter.
Note: Windows XP is not having capabilty to identify the unknown volume.
Your Data is now safe from unauthorised users.
To access the content of hidden Drive repeat the process mentioned above. But in 4th step replace ” remove” by “assign”.
It means type “assign letter E”.

How data recovery programs works

Have you ever wonder, how data recovery software works ? I mean, everybody knows, when you delete files them are going to a special folder Recycle Bin, but what is happening when you empty Recycle Bin ? To understand this we must first understand how data are stored on storage devices e.g. hard drives. I don’t want to write a very “technical” article, instead I will try to keep it as simple as I can.
The most commonly file system formats used in modern Microsoft Windows based systems are FAT (File Allocation Table) and NTFS (New Technology File System). The FAT and FAT32 is used predominantely by systems running earlier Windows versions than Microsoft Windows XP for USB flash drives or memory cards, while NTFS is preffered for newer versions of Windows : XP, Vista, 7 or Windows Server 2008.
The smallest data unit is called a sector and has on Windows based systems hard disks a default size of 512 bytes but it’s not used for direct space allocation as it is, instead the filesystem use multiple sectors to hold a data file.  Them are called clusters and are composed from 1 sector (512 B) to 128 sectors (64 KiB).

A) — a concentric magnetic field is called a track;
B) — a geometrical sector;
C) —  tracks are divided in sectors the smallest unit for holding data. Usually it can hold 512 bytes of data. However, for storing a file, the smallest unit used is a cluster. Sectors identification data as starting adress are written at the beginning of the sector by the factory track-positioning data;
D) — multiple sectors , from 1 up to 128, forms a cluster. In the image above the cluster are composed by 4 sectors. If a sector is 512 bytes in size, then the cluster can hold 2048 bytes. For a file with a size in 0-2000 bytes range, a cluster will be allocated. Always the sectors numbers composing a cluster is an exponent of 2 : 1 sector, 2 ,4 , 8 and so on;
When a user format a hard drive under Windows, he must choice an  Allocation unit size in this range: 512B–64KB. If we have a lot of small files in the computer and we are using big allocation unit size, this result in a lot of wasted hard disk space. For example if we have a lot of around 20-30KB size files and we allocate for them 64KB space storage, the rest of unused space is wasted, however taking in calculation actual hard disk sizes this is not something to concern us too much like in the past when hard disk space was limited and expensive.
In FAT architecture, the files and directories are stored in Data Region. There is also Directory Table where are stored informations about files and folders, names, extensions, attributes of the files, creation time, the adress of the first cluster of the file thus pinpointing which clusters are used to store a certain file or directory, and finally the size of the file or directory. Each entry associated with a file has 32 bytes in size.
In NTFS architecture the Directory Table is replaced by the Master File Table(MFT) containing  informations about the files as : length of a file, location of the file, permissions (not available for FAT). These informations are known as file attributes and are stored in so called metadata files.
The FAT Region is kind of table of content containing informations about all clusters in a partition. It includes multiple records about clusters e.g. :  if it’s a free cluster, if it’s a bad one, if it’s used and what is the next cluster in the chain or if it’s the last cluster in the chain(or EOC-End Of Chain) allocated to store a file.
The Boot Sector containing the system boot loader code is located in Reserved Sectors. Another subsections as File System Information Sector or Backup Boot Sector are also placed there.
The first sector on a hard disk is the Master Boot Record or MBR created concomitant with the creation of the first partition on hard disk. For other un-partitioned storage devices the first sector is called Volume Boot Record, VBR shortly. This is the case also for a hard disk with  several partitions, the first sector in a partition is VBR while the first sector of the whole hard disk is MBR.
The MBR contains a partition table with entries for each partition, when a Windows system is booting, the MBR code loaded by the bootstrapping firmware contained within the ROM BIOS, search for a partition marked as active and when it is found, it reads the VBR code from that partition passing the control to the Windows loader(NTLDR for all versions of  Windows up to Windows Server 2003). On the later Microsoft Windows versions as Vista or Windows 7, NTLDR is replaced by the Windows Boot Manager(BOOTMGR) which contain the boot loader code–the bootstrap and the functionality is the same as the NTLDR.
Now on the subject, what is happening when a file is deleted from Recycle Bin and when a NTFS hard disk is formatted ? When you empty the Recycle Bin, all the files from there are marked as deleted and unusable by the operating system and their allocated space may be available to be overwritten by another file. This is why you have a great chance to recover a file if the recovery actions are taken immediately after deletion. Older deleted files has more chances to be overwritten by the new files we save on the hard disk and thus fewer chances to be fully recovered.
In the case of hard disk formatting, the Master Boot Record and the Master File Table are erased but the real data of the files are still there on the hard disk being possible to recover them. The format system offer two options, quick and full format with only difference that the full formatting of a hard disk will check for “bad sectors”, will flag it as unusable by the operating system and will try to reallocate it with a sector that is keept as a “back-up” sector on the hard disk. On every hard disk there is a bunch of sectors specially reserved for replacing the eventually bad sectors.
However this is the theory, because when a formatting of a hard disk or a storage device is done, only MFT and MBR(VBR) for NTFS or the Directory Table for FAT structure is erased but the files still exists, a software can instruct the driver for a low level “bit-by-bit or better said sector-by-sector” reading of the device looking for data files.
Consequently if you want to truly delete your data,a special software must be used the so called “disk scrubbers, shredders or disk wipers”, able to overwrite all the sectors on hard disk with 0 character or special bit patterns. Often such software has an option for repetition of deletion for the most “paranoids” of users. Though I never tested them, there is software that claims it can recover overwritten data by instructing the hard disk driver to read low level remanent magnetic fields on a hard disk, that’s why some of the users preffer to wipe the hard disk several times. However, in forensic laboratories this is theoretically possible. If you sell or donate your old computer, old laptop or you are keeping sensitive data on the computer and you are afraid for it to be stolen, a disk wiper may interest you.
Let’s mention some good data recovery software :
iCare Data Recovery Software
It can run from an USB  device, no need to install it in the computer and does a pretty good job recovering in seconds lost data from hard disks, memory cards, smart media, ipod and almost any storage device. The recovered files for example photos can be previewed while the searching for files continue. The program can helps if :
  • Drive become raw;
  • Corrupted MBR;
  • Lost partitions or USB device not detected error;
  • Drive not formatted error;
  • Recover files from dynamic disk, RAID ;
  • Bad MFT, bad MBR, bad partition table;
  • Deleted files by viruses;
  • Accidentally deleted or formatted hard disk or any other media storage;
When the program starts it present to the user 4 options, as follows :
  • Lost Partition Recovery;
  • Advanced Files Recovery;
  • Deep Scan Recover, itb uses a special algorithm;
  • Format recovery;
I’ve already mentioned that programs recover files and folders real quickly and with a big rate of success.
As a bonus for reading this article, you can have iCare Data Recovery Software for free and this is why :
Was a Free license giveaway that must end in 25 May 2010, but when I’ve tested the download link from the official site and the giveaway license I’ve found on the Internet, I have had the pleasant surprise to discover the free license still works.
The free license code is :
2K1XB2X964MPHOCJ8M1R6IJF0OVHFOFH
and the official download link is here.
Grab it quickly while you can still have a 69,95$ worth software for free.
EASEUS Data Recovery Wizard
Offer a free edition of the software. It has an intuitive interface, being very simple to use, recover from formatted disks, memory cards, flash USB drives.
Recuva
From the creators of well known CCleaner, it’s a free product with a portable version provided aswell. Restore deleted emails, Word documents, iPod music, photos from a deleted or formatted partition from your PC or from a memory card. A preview of any recovered image is possible in the program window.
For disk wipe utilities can be mentioned :
Disk Wipe
Free software doing very well its job. It uses several  shredding algorithms and can definitively erase hard disks, USB thumbs or memory cards.
Eraser
It can erase your hard disk according to the US Department of Defense (DOD) standard to repete the data overwritten process with random bytes, 3 or 7 times or the Gutmann recommendation of 35 times. It works under all versions of Windows including Vista and Windows 7.
Freeraser
The same as previous, it eliminates all the possibilities to recover data from a processed storage device.
Disk Scrubber by MariusSoft
It has an affordable price, it’s a relatively new software. It can wipe the NTFS partitions of your hard disk.