Saturday 15 June 2013

Access Data of a Password Protected User in Windows XP when fails to Boot

You may come across a situation in which your windows XP PC fails to reboot, and the most accepted solution to that problem is to re-format the Hard Disk. Before formatting, you should backup your files. If your computer is password protected, you won't be able to access them from outside, so here is a method for getting around this.


Steps :


1. Boot the machine from Windows XP bootable CD.
2. At the setup screen, select R to repair using Recovery Console.
3. Now the console program will prompt you to select the Windows folder (eg. C:\WINDOWS) where the Windows is installed (you need to enter a number from the list of folders shown to you).
4. Type 'HELP' (without single quotes) and press enter for available commands. This is like a DOS program, but some features are not available
5. Change the current directory to the user's directory where you want to backup.
6. Type 'CD "C:\Documents and Settings\X"' (without single quotes) and press enter. Where X is theusername.
7. Now the current directory will change to "C:\Documents and Settings\X".
8. Now change the directory to Desktop by entering 'CD Desktop' (without single quotes) and press enter to go to the desktop folder.
9. Type 'DIR' (Without single quotes) and press enter, you will be listed all the available files in Desktop.
10. Type 'COPY a.doc D:\BACKUP' (without quotes) and press enter, where a.doc is a file available in Desktop and the folder D:\BACKUP available to copy the files.
11. As in step 7,8,9,10 you can backup other folders like "My Documents", "My Music", etc.
12. Note that you cannot use wildcards for COPY, i.e. you cannot copy all the files in a folder at once. You must copy one file by one. 


  Before doing this, try changing the password to blank so that you can access the data from another machine to easily drag and drop to copy your data.
  Any data not backed up will be permanently deleted when you re-format the hard drive, so make sure you back up any thing you want to keep.

Requirement:

A Bootable Windows XP CD

How to Crack password protected RAR files like a hacker (Brute Force attack)?

Install the RAR password remover software as said in my last post. 
Let me show how to crack the password protected RAR files using Brute Force attack method. 

Step 1:
Run the application start->Allprograms->RAR password Recovery->RAR password Recovery

Step 2:
Now the Password Recovery windows is opened. Click the open button at the top of the window.


Step 3:
Browse to the Password protected RAR file and select.


Step 4:

Now set the Minmum and Maximu length of password(it's your choice)
Set allowed characters(if you think it is simple password, then select only lowercase).


Step 5:Start Cracking process
Click the Start Button. It will start to crack using brute force attack.
Wait..wait...wait........

It will take time depending on the password strength. 
if you have luck, it will be finished within 10 minutes
if you have bad luck, it will take 10months. 
All depending on the password strength.

How to crack or Reset BIOS Password?


The BIOS software is built into the PC, and is the first code run by a PC when powered on ('boot firmware'). The primary function of the BIOS is to set up the hardware and load and start a boot loader. When the PC starts up, the first job for the BIOS is to initialize and identify system devices such as the video display card, keyboard and mouse, hard disk drive, optical disc drive and other hardware. The BIOS then locates software held on a peripheral device (designated as a 'boot device'), such as a hard disk or a CD/DVD, and loads and executes that software, giving it control of the PC. This process is known as booting, or booting up, which is short for bootstrapping.
Bios password is usually used to protect the user's BIOS settings on the computer. If you want to reset the password on the BIOS does not need to bother to connect bateray CMOSnya, with a little trick on the Dos you can reset the BIOS password on it in 2 ways:

1. Clear CMOS
This way I consider the most ancient and most easy to break down the password on the BIOS. The steps are easy, first open the casing cover computer CPU. Then find the bios battery that looks something like the battery just a little more big clock. After the meet and consider the area around the battery there is usually a jumper with 3 pins, 2 pins and 1 pin not connected. 

Suppose the three pins with the code 1 - 2 - 3. Connector that connects the initial position usually is 2-3. To reset the bios do I move the position of the plug that connects pins 2-3 to position 1-2 for about 5 seconds. Then plug it back into the starting position (2-3). Try restarting the computer back on, secured the bios password is gone. 

If the above looks complicated, is easy to clear cmos by unplugging the BIOS battery and then put it back. But with the consequences of removing the label is the warranty on the battery BIOS.

2. Through DOS 

First out of the windows with me restart your computer, start the computer in MS-DOS mode, use the option "Command Prompt Only" 

At c: prompt, type: DEBUG 
press enter. You will see the sign (-) at the DEBUG prompt, then type: 
o 70 2e 
at the DEBUG prompt will be displayed as-o 70 2e. 
press enter and type: 
-O 71 ff 
press enter, the last type: 

hit enter, then you will get out of the DEBUG prompt and return to the C:> prompt. 
Now restart your COMPUTER, and see the results 

Wednesday 1 May 2013

Ostinato - Packet/Traffic Generator and Analyzer


Introduction
Ostinato is an open-source, cross-platform network packet crafter/traffic generator and analyzer with a friendly GUI. Craft and send packets of several streams with different protocols at different rates.

Features
Runs on Windows, Linux, BSD and Mac OS X (Will probably run on other platforms also with little or no modification but this hasn't been tested)
Open, edit, replay and save PCAP files
Support for the most common standard protocols
Ethernet/802.3/LLC SNAP
VLAN (with QinQ)
ARP, IPv4, IPv6, IP-in-IP a.k.a IP Tunnelling (6over4, 4over6, 4over4, 6over6)
TCP, UDP, ICMPv4, ICMPv6, IGMP, MLD
Any text based protocol (HTTP, SIP, RTSP, NNTP etc.)
More protocols in the works ...
Modify any field of any protocol (some protocols allow changing packet fields with every packet at run time e.g. changing IP/MAC addresses)
User provided Hex Dump - specify some or all bytes in a packet
User defined script to substitute for an unimplemented protocol (EXPERIMENTAL)
Stack protocols in any arbitrary order
Create and configure multiple streams
Configure stream rates, bursts, no. of packets
Single client can control and configure multiple ports on multiple computers generating traffic
Exclusive control of a port to prevent the OS from sending stray packets provides a controlled testing environment
Statistics Window shows realtime port receive/transmit statistics and rates
Capture packets and view them (needs Wireshark to view the captured packets)
Framework to add new protocol builders easily

Download 

Defending DDoS attacks on Apache webserver the easy way


Defending any server from DDoS is always like , protecting a virgin on a lonely island from 100 rapists. But we have a effective method to stop these brutal f*cking to protect our respective Apache web server.  Here we have one Apache module called Mod_evasive, Mod_evasive is an Apache unit that is intended to boundary the shock of unusual types of attacks like Distributed Denial of Services Attack or may be  brute force on your web site/server. while incorporated with iptables, mod_evasive can set up to even larger attacks. The component detect attack by creating an domestic hash of IP Addresses and URIs, and denying any single IP address from executing request a page more than the allowed times per second, make more than 50 concurrent requests per second on the same child process, make a single request while blacklisted

On any DEBIAN based operating system like Backtrack 5 R2 or Blackbuntu just follow the following command to install it.

$ sudo apt-get install libapache2-mod-evasive

After its installation done , the component  is already enabled and is defending your web server automatically.

How to Secure your Enterprise with Free SSL Certificate

The Secure Sockets Layer (SSL) is a commonly-used protocol for managing the security of a message transmission on the Internet. SSL has recently been succeeded by Transport Layer Security (TLS), which is based on SSL. SSL uses a program layer located between the Internet's Hypertext Transfer Protocol (HTTP) and Transport Control Protocol (TCP) layers.

Why Use SSL ? 
Secure Sockets Layer (SSL) is a message transportation protocol that provides the following

Advantages of SSLAuthenticated:- The origin of all messages is assured.

Reliable:-The message transport uses a message integrity check (using a MAC) that ensures the quality of the data being transmitted.

Private:-Messages between the components are encrypted, after a handshake to define a secret key. This ensures that the contents of the messages cannot be read by a third party. If all of your components are behind a firewall, or some other means of protection, and do not require encryption, privacy can be disabled without comprising the authentication and reliability aspects of SSL.


               :: 0x02 Starting to Setup up SSL ::

Things required ssh with root access (For this Tutorial) Apache web server (I’m using apache, slightly different method for others)
An Account at http://www.startssl.com (Sign up for the free one)

Let’s Start,Generating RSA Private key
Install & enable OpenSSL (sudo apt-get install openssl / yum install openssl & then sudo a2enmod ssl
; sudo /etc/init.d/apache2 force-reload)


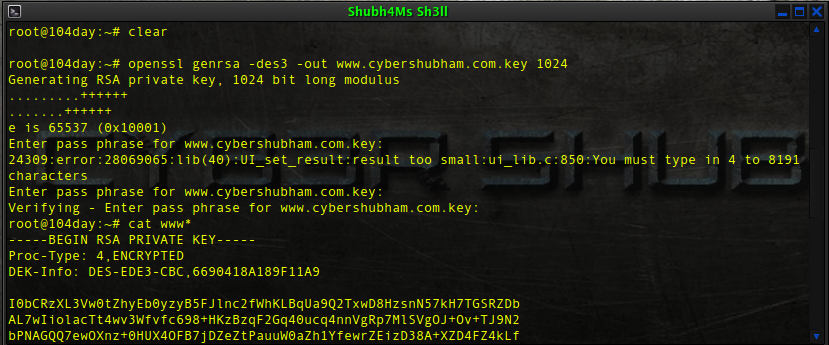
Then to generate the key, give this command.

# openssl genrsa -des3 -out www.cybershubham.com.key 1024


The key will be generate now, and will be saved as www.cybershubham.com.key.

Generating CSR (Certificate Signing Request)
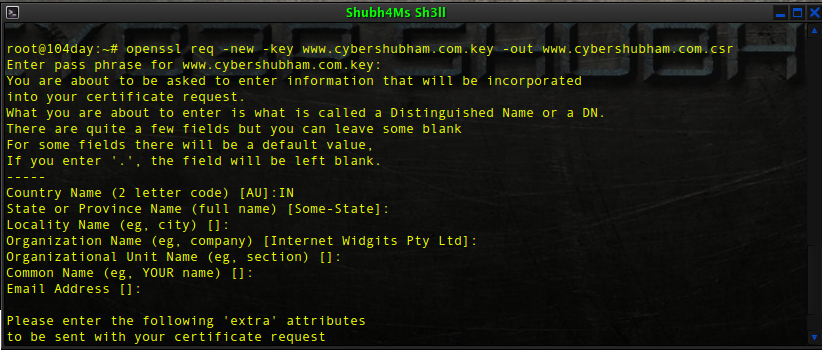
Using the key generate above, you should generate a certificate request file (csr) using openssl as shown below with following command.

# openssl req -new -key www.cybershubham.com.key -out www.cybershubham.com.csr


The csr will generate now, & will be saved as www.cybershubham.com.csr                   :: 0x03 Getting a Valid Signed Certificate ::

Hope you have already registered at StartSSL, & validated your domain name.So let’s go forward,

   :: 0x03 Getting a Valid Signed Certificate ::

Hope you have already registered at StartSSL, & validated your domain name.So let’s go forward,

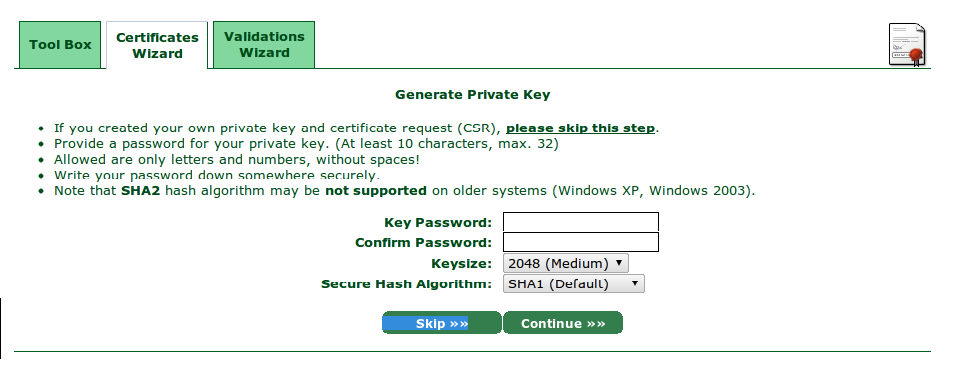
Select Certificate Purpose

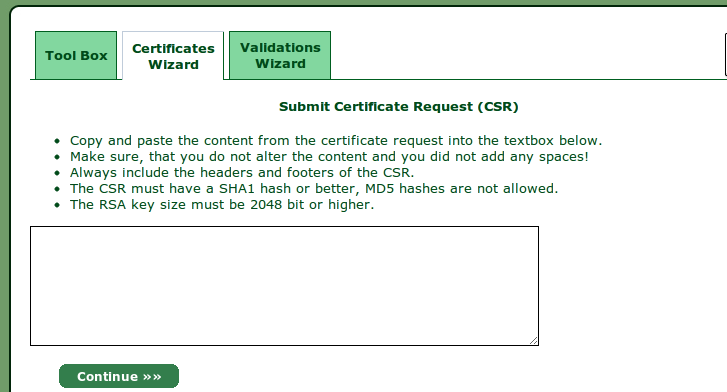
Submit CSR

Skip the above screen & move forward, as we have already generated the CSR & Key.


Paste your CSR here & click continue.
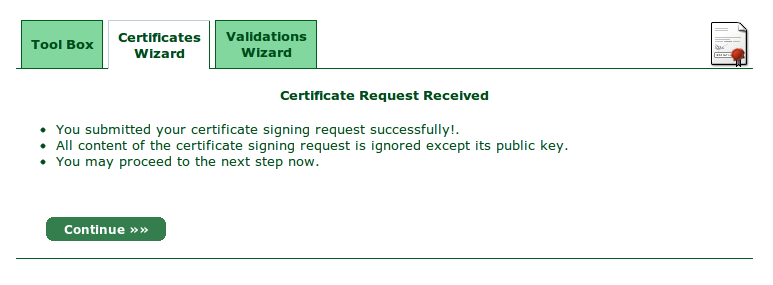
Click continue.
Selecting Sub Domain

As for the basic free certificate, we don’t get certificate for all our sub domains. you want ssl for your main website. just put www.
Follow the rest 1-2 steps, they are easy.
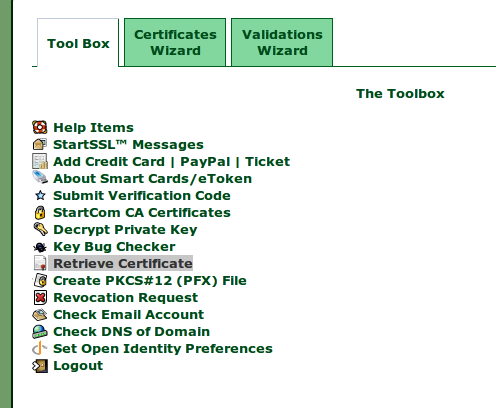
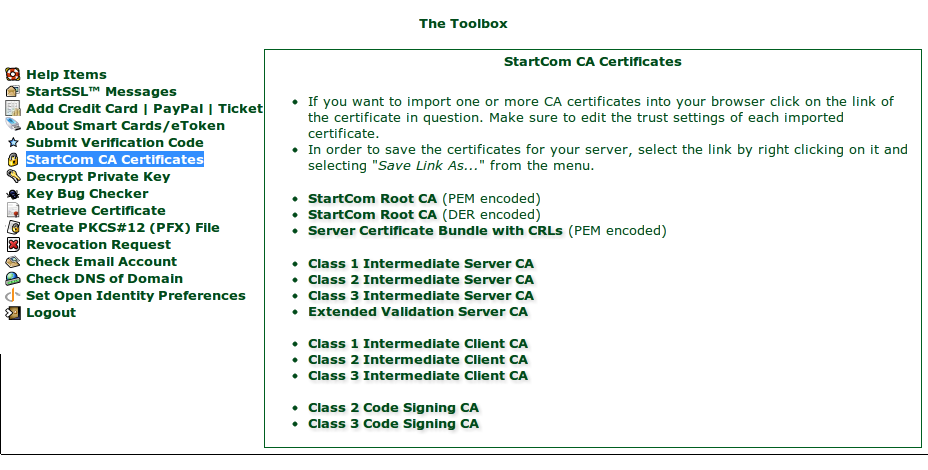
Retrieve Chain File

Download the StartCom Root CA (PEM encoded file).

:: 0x04 Configuring Web Server ::

Every web server has different configuration, I’ll tell you how to configure apache.

Step 1- Gather all files- the key file(www.cybershubham.com.key) ,  The retrieved certificate file (www.cybershubham.com.crt) , the Chain file (CA.pem)

Step 2-
# cd /etc/apache2
# mkdir ssl

Step 3-
Upload all files in the ssl directory with ftp or simply use nano command in ssh.

Step 4-
# cd /etc/apache2
# cd sites-available
# nano default-ssl

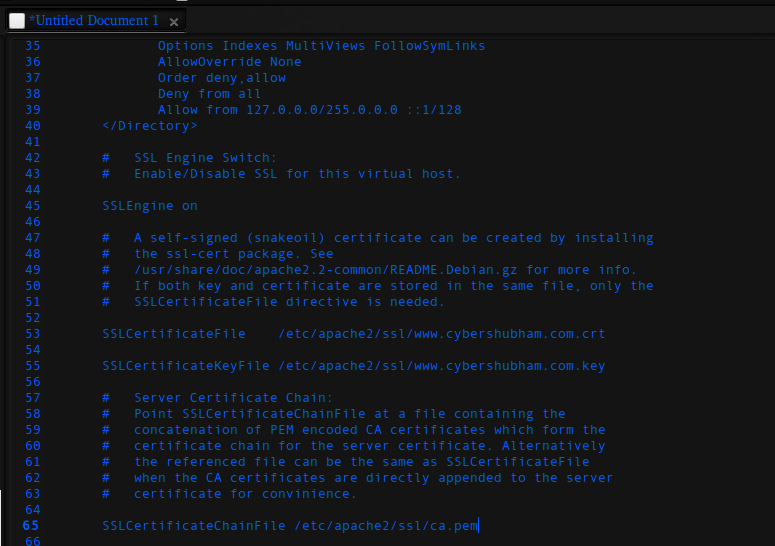
Most important part, but quite easy just set the write path to files. like this-


Step 5- Configure ports
# cd  /etc/apache2
# nano ports.conf

simply add "listen 443” after listen 80 line. (without quotes)

Step 6- Restarting Apache

# /etc/init.d/apache2 reload
# /etc/init.d/apache2 restart


Now you are done !!! Just open https://www.cybershubham.com to check if it works ;)

Step 7- Make https default
# cd /var/www/cybershubham.com/web/
# nano .htaccess

Paste the following content now -

RewriteEngine On
RewriteCond %{SERVER_PORT} 80
RewriteRule ^(.*)$ https://www.cybershubham.com/$1 [R,L]

Now all users will land on https :),Hope you liked the post. 

Tuesday 16 April 2013

The history of Hacking


I have remodified this History of hacking based on St. Petersburg times newspaper


The history of computer hacking can be traced back to the 1870s, but I will emphasize on the most recent years for simplicity.
The 1960s

    It all started at MIT’s (Massachusetts Institute of Technology) artificial intelligence lab.The university’s mainframe computers were used by the first hackers. At first, hacker was a name with a positive significance for a person who was good at computers and could push computer programs beyond the normal functioning standard. It was a borrowed name from a term to describe members of a model train group at MIT who hacked the electric trains and switches to make them perform faster, better and differently.


The 1970s

    John Draper was the talk of the 70s because of his ability to make free calls. He built a "blue box" that, when used together with the whistle and phone receiver, phone calls would be made for free. He was arrested on several counts for tampering with the phone lines throughout the 70s. Steve Jobs, Steve Wozniak (founders of apple computer) used this knowledge.


The early 1980s 

    People often say the public was lured into hacking by the movie war game. The main character was Matthew Broderick. It is said that the movie made hackers seem cyber heroes which captured the imagination of young minds in this year.

    Hacking groups like Legion of Doom in the United States, and Chaos Computer Club in Germany began to emerge. Sherwood Forest and Catch-22 were used by phreaks and hackers to interact, and share stolen passwords and credit card numbers.

    Los Alamos labaoratory’s computers for developing nuclear weapons were hacked by the 414 gang. A gang that comprised of six teenagers who were later apprehended by the law.


The Late 1980s

    The Computer Fraud and Abuse Act was passed in 1986
    A self-replicating worm was use on the government's ARPAnet to test its effect on UNIX systems by Robert T. Morris, Jr., a graduate student at Cornell University. Which later spread to 6000 computers. He was fined 10,000 USD.

    Some German hackers were arrested for breaking into the United States government and corporate computers and sold operating-system source code to the Russian KGB.


The early 1990s

    A radio stations phone system was rigged by three hacker-friends during a call-in contest. They won 20 000USD, two cars and all expense paid trips.

    The use of internet came in and hackers started formulating new strategies.

    Kevin Mitnick was arrested for stealing 20,000 credit card numbers.

    Vladimir Levin and other Russian crackers siphoned 10 million USD from Citibank and transfer it to bank accounts in Finland and Israel.


The late 1990s
    The hacking group Cult of the Dead Cow releases its Trojan horse program, Back Orifice. Once installed on a machine with Windows 95 or Windows 98 Operating systems, it allows unauthorized remote access to the machine.
    A 19-year-old Israeli hacker Ehud Tenenbaum known as Analyzer was arrested for breaking into pentagon’s computers and stealing some software.


The 2000s 

Well, the popular attacks in the 2000s are,
    the attacks launched on yahoo, Amazon and eBay, that resulted to the denial of service for users.


    Break-ins on Microsoft, for latest versions of their products. The 2001 attack that led to the prevention of millions of users from reaching Microsoft Web pages for two days.


This brief history of Hacking and cracking above is meant to serve as a quick reference point to those who really want to know how it all started. That's why its been in summary. Its good to know the history of most things we do.